A walk through of cracking the Megatouch© Force 2009
Thank you to Nicholas Navaroli for using the original instructions from the 2011 hack and doing the work to figure out and make the changes so this works with 2009.5 software!
NEW: 9/6/2020
Tri Towers "Security Key Mismatch patch added (step 12) - Thanks to Nicholas Navaroli for creating and testing the patch!
All the steps below required you install the latest version of the Megatouch Force 2009.5 software
Step 1: Obtaining access to the shell
The first step needed to crack the system is to get shell access to the system itself. The easiest way to do this is plug in a keyboard and override the Linux kernel boot configuration options to boot to run level 3- Using a Phillips head screwdriver remove the metal panel on the back of the megatouch, exposing the external USB port
- Plug in a USB keyboard into the USB port
- Turn on the machine, when you see the "FORCE" logo, hold down the "Alt" key, keep it held down till you see a red box on the screen and a console that says "boot:"
- Enter the following line
linux-V27_03 3 - Once the sytem is booted and prompting for a login, login with the following credentials
- username: maxx
- password: maxx
- You are now logged in as root
- Once you login you will most likely want to edit or copy files on the system. To do that you must first set the root filesystem (/) to read/write using the following command.
root@linux# mount -o remount,rw /
Step 2 - Obtaining the game code
On the Force 2009 the main game code is actually hidden with another binary. When the system starts, it launches /usr/local/bin/start. This code is just a wrapper program that contains and extracts the actual game binary. start extracts the real game binary from itself via /proc/self/exe, then it performs some decoding and finally writes the new program to disk as /tmp/dstart and launches the new binary.While the designers of this code jump through a few hoops to try to hide the actual game binary, it is trivial to bypass all their work. Simply lauch /usr/local/bin/start and then copy out the decoded file from /tmp/dstart. To do this you must do the following steps.
- Patch out the code in /usr/local/bin/start that deletes /tmp/dstart
- this can be accomplished by overwriting 5 bytes of code with 0x90's at virtual memory address 0x8048b7d which is located at offset 0xb7d in the binary /usr/local/bin/start.

Here a command that will perform the patch
root@linux# perl -e 'print "\x90" x 5' | dd bs=1 count=5 seek=2941 of=/usr/local/bin/start conv=notrunc - Now launch /usr/local/bin/start. It will print some things to the screen and then crash, returning you to the command prompt.
-bash-3.00# /usr/local/bin/start - Once it crashes the file /tmp/dstart should be extracted. Move it to /tmp/extracted_dstart
*Note: If your wondering "couldn't I just have started the game normally and then copied /proc/<PID_of_dstart>/exe? The answer is yes, but the steps above were easier for me to write up.-bash-3.00# mv /tmp/dstart /tmp/extracted_dstart
Step 3: Replace /usr/local/bin/dstart
The next step is to replace the original /usr/local/bin/start binary with the binary you copied from /tmp/dstart. After you copy, ensure the SUID permission is set.The commands below will do this for you assuming your extracted file was called /tmp/extracted_dstart
-bash-3.00# cp /tmp/extracted_dstart /usr/local/bin/start
-bash-3.00# chmod 4755 /usr/local/bin/start
All the steps below required you install the latest version of the Megatouch Force 2009.5 software.
Step 4: Altering the graphics startup process
In this step we will reconfigure the system to not automatically boot into the game when it restart, however it will boot into the graphics system which is required for the step 6 to be successful.Type the following commands:
-bash-3.00# cp ~/.xinitrc ~/.xinitrc.bak-bash-3.00# echo "xterm" | cat - ~/.xinitrc.bak > ~/.xinitrc-bash-3.00# rebootStep 5: Make the disk writeable again
Since we rebooted we have to tell the system to take the disk out of read only mode and let us write to it, just as we did in the first series of steps.First you will notice the system boots to a black screen with a white terminal box, touch the touchscreen in the area of the white terminal box, then type the following command.
-bash-3.00# mount -o rw,remount /Step 6: Extract the encrypted data from your actual key
In this step we will extract the encrypted data from your Dallas DS1996 Key and save it to the file /.key. This is actually easy to do as on the Force 2009 there is a debugger on the system which allows you to easily manipulate the running code.
- First insert your key into the key holder
- Follow the commands below to dump the key to /.key
-bash-3.00# gdb /usr/local/bin/start GNU gdb 6.5 Copyright (C) 2006 Free Software Foundation, Inc. GDB is free software, covered by the GNU General Public License, and you are welcome to change it and/or distribute copies of it under certain conditions. Type "show copying" to see the conditions. There is absolutely no warranty for GDB. Type "show warranty" for details. This GDB was configured as "i686-pc-linux-gnu"...(no debugging symbols found) Using host libthread_db library "/lib/libthread_db.so.1". (gdb) break *0x834bb3d Breakpoint 1 at 0x834bb3d (gdb) command Type commands for when breakpoint 1 is hit, one per line. End with a line saying just "end". >dump memory /.key $ebp-0x40c $ebp-0xc >end (gdb) run Starting program: /usr/local/bin/start [Thread debugging using libthread_db enabled] [New Thread 16384 (LWP 712)] Got rlimit [1024,1024] Set rlimit [896,1024] Initing Logging System. Starting Log System Init [/var/merit/logging/logs/20001024171040.running.log] Current time is Tue Oct 24 17:10:40 2000 (972407440) Renamed Dirty Log [/var/merit/logging/logs/20001024170230.running.log] to [/var/merit/logging/logs/20001024170230.dirty.log] loaded loglimits (/usr/local/share/merit/config/loglimits.xml) Loaded default loglimits, initialising SettingsManager: added loglimits: 0 settings objects loaded Archiving on Limits [21 Days][1000 Files][150000000 Bytes] Total Dir Size [89152] Bytes in [7] Files Deleting on Limits [0 Days][1000 Files][300000000 Bytes] Total Dir Size [14464] Bytes in [2] Files No logging filter present. Finished Log System Init SettingsManager: 0 settings objects loaded Current buffer -1 will be invalid [Switching to Thread 16384 (LWP 712)] Breakpoint 1, 0x0834bb3d in USBIO::ReadDS1995KeyData () (gdb) quit The program is running. Exit anyway? (y or n) y - Now use the commands below to verify that /.key was created
-bash-3.00# ls -l /.key - The results of the command above should match the line below. Ensure the 5th column reads 1024.
-rw-r--r-- 1 root root 1024 Oct 24 17:10 /.key
Step 7: Patching KeyManager::Check()
We are now ready to patch the main game binary which we stored as /usr/local/bin/start. We will need to patch this code in a few places to bypass the need for the physical key. The first of these patches in the the KeyManager::Check() function. Normally KeyManager::Check will do a few of checks of the Dallas Key data. For example checking to see that a Dallas key is physically present in the key holder, what DS 199x key family it is, what range the serial number is etc. Our patch will greatly simplify this function. The C code for our KeyManger::Check() after patching would look like this.
int KeyManager::Check(void) {
  return 1;
}
ia32 Assembly Instruction Machine Code Values
xor eax, eax 0x31 0xC0
inc eax 0x40
retn 0xC3
This code is located at offset 3122886 in the binary /usr/local/bin/start. The command to perform the patch is:
-bash-3.00# perl -e 'print "\x31\xC0\x40\xC3"' | dd bs=1 count=4 seek=3122886 of=/usr/local/bin/start conv=notruncStep 8: Writing machine code to read the the stored key data from disk
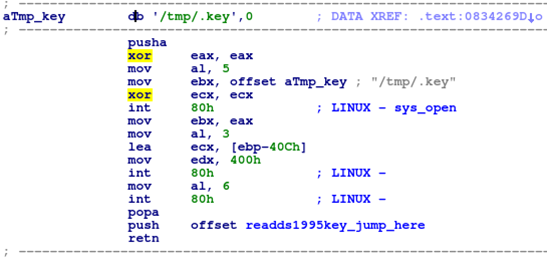
The system needs the data from the Dallas key, it contains important configuration information such as what region the game is in, and what games and options are available. Remember in step 4 we were able to read the encrypted data from the key and store it on disk as /.keyIn this step we will write some custom machine code to read the data from disk and store it into a certain memory address that the game expects the encrypted data to be in.
The assembly code looks like this

The machine code should be patched somewhere in the space freed when we shortend the KeyManager::Check() function. We will start is immediately after our patched KeyManager::Check() ends which is at offset 3122890 in the file /usr/local/bin/start
To add this code run the following commands
-bash-3.00# perl -e 'print "\x2F\x2E\x6B\x65\x79\x00\x00\x00\x00\x00\x60\x31\xC0\xB0\x05\xBB"' | dd bs=1 count=16 seek=3122890 of=/usr/local/bin/start conv=notrunc
-bash-3.00# perl -e 'print "\xCA\x26\x34\x08\x31\xC9\xCD\x80\x74\x04\x53\x6E\x6F\x42\x89\xC3"' | dd bs=1 count=16 seek=3122906 of=/usr/local/bin/start conv=notrunc
-bash-3.00# perl -e 'print "\xB0\x03\x8D\x8D\xF4\xFB\xFF\xFF\xBA\x00\x04\x00\x00\xCD\x80\xB0"' | dd bs=1 count=16 seek=3122922 of=/usr/local/bin/start conv=notrunc
-bash-3.00# perl -e 'print "\x06\xCD\x80\x61\x68\x3D\xBB\x34\x08\xC3\x68\x61\x63\x6B\x65\x64"' | dd bs=1 count=16 seek=3122938 of=/usr/local/bin/start conv=notrunc
Step 9: Patching KeyManager::ReadDs1995KeyData() to read the key data from disk
In step 7 we patched the system so that it always thinks a valid key is in the game. However to fully play the game the system needs the data that is stored on the key. In this step we patch the game so that rather than trying to read the key data from the physical key, instead we read it from the copy of the data we dumped from the physical key in step 6. We do this by updating the game code so rather than calling USBIO::ReadUSBMemory() it calls the code we created in step 6 that instead reads the data from /.keyHere is the command to make that patch
-bash-3.00# perl -e 'print "\x68\xD4\x26\x34\x08\xC3\x53\x6E\x6F\x42\x00\x90\x90\x90"' | dd bs=1 count=14 seek=3160697 of=/usr/local/bin/start conv=notrunc
Step 10: Patching USBIO::ReadKeyId()
We are almost done. One of the last tasks is to change the operation of USBIO::ReadKeyID() which reads and "fixes" the serial number from the actual Dallas Key.Under normal operation the game reads the serial number from the physical Dallas key, it then "fixes up" the serial number. If there is no key present the game instead loads a fake serial number "A5 A5 A5 A5 A5 A5 A5 A5". We are going to patch the code so that it ALWAYS reads in a static serial number that we provide, we will later patch that serial number to be the serial number of the real key. Here is the command to make that patch
-bash-3.00# perl -e 'print "\x74"' | dd bs=1 count=1 seek=3160237 of=/usr/local/bin/start conv=notrunc
Step 11: Patching is the serial number
In step 10 we changed the code so that the game will not read the serial number from the physical key, but instead read it straight from static data in the game code. In this step we patch in the actual serial number from our real key. To do this get out your real key. The bottom of the key should look like the picture below. Read the serial number from the right to left in groups of 2 digits, the first 2 digits and the last two digits are above the rest of the digits. In this example the data would be0C 2B C5 FB 00 00 00 5E
Now split the the characters into two parts, each with 8 digits.
| Part #1 | Part #2 |
| 0C 2B C5 FB | 00 00 00 5E |
-bash-3.00# perl -e 'print "\x0C\x2B\xC5\xFB"' | dd bs=1 count=4 seek=3160262 of=/usr/local/bin/start conv=notrunc-bash-3.00# perl -e 'print "\x00\x00\x00\x5E"' | dd bs=1 count=4 seek=3160269 of=/usr/local/bin/start conv=notruncStep 12: Fix the Tri Towers security key check
-bash-3.00# perl -e 'print "\x31\xC0\x40\xC3"' | dd bs=1 count=4 seek=3159826 of=/usr/local/bin/start conv=notruncStep 13: Reset the graphics system
Now we have to undo the changes we did in step 4, so the system automatically starts the game again. TYpe the following command.
-bash-3.00# mv ~/.xinitrc.bak ~/.xinitrc
Step 14: Remove your key
At this point you can remove your security key. You game now should work without needing the key, you no longer need to worry that your key battery will expire rendering your system useless.Step 15: Reboot the system, and enjoy your game!
-bash-3.00# reboot


